GNI Feature: Jalapeno Spiced Hummus

Carrots and Cake, Nita Sharda

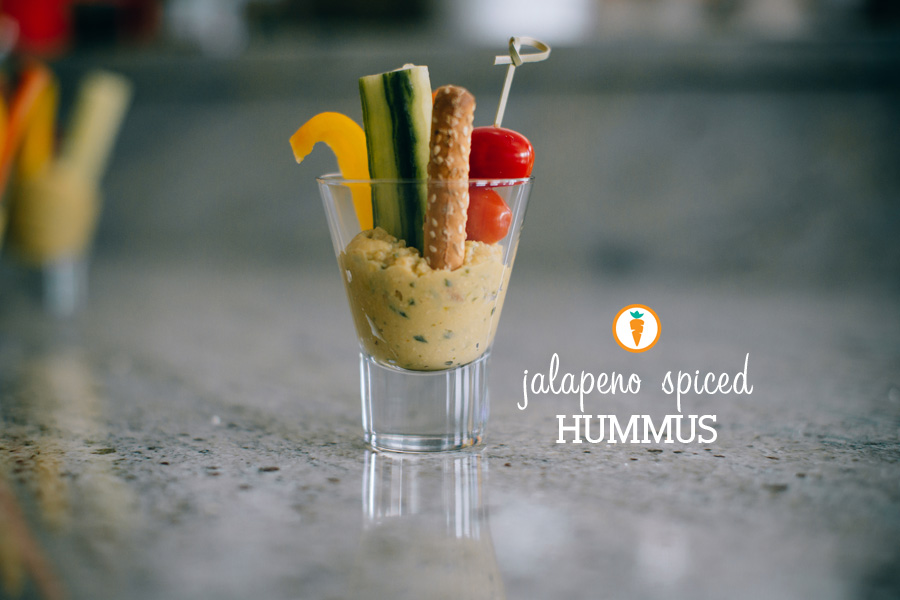
Perfectly spiked and ready to enjoy.

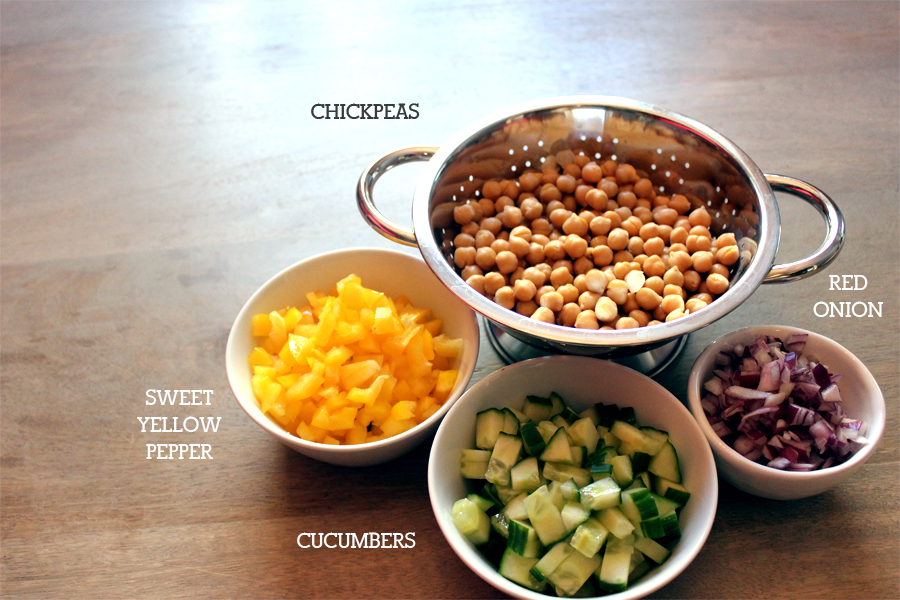
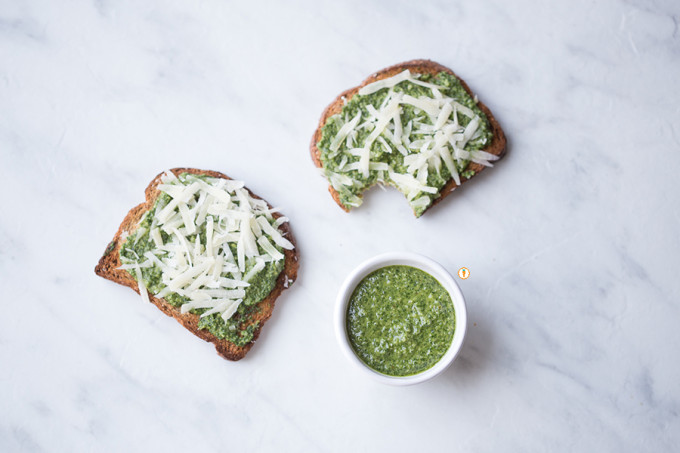
Today I’m thrilled to share the first of a recipe series from the girls-night-in (GNI) I hosted a few weeks back. The recipe below is for hummus which is often used as a spread or dip. The main ingredient is chickpeas and often most recipes contain tahini. Because tahini isn’t a staple in my home, I opted to create a hummus spread without it. The base of this recipe came from my glob-trotting, foodie-extraordinaire, yogi friend (also a fellow Dietitian), Allie of Balanced with Allie.  It’s the kind of recipe you can spike with multiple flavors: chilli, sun-dried tomatoes, garlic or caramelized onion–yum! The options are endless.

I’m particularly fond of hummus because unlike many commercial spreads and dips, it’s not loaded with starches, sodium, fat or cheap ingredients. It’s also a great way to incorporate more beans and legumes into your lifestyle if these aren’t foods you typically cook with. Not to mention, it’s super easy to put together. All you need is a blending device or an immersion blender! Hummus also freezes well – yaay for batch cooking!

Enjoy!

Jalapeno Spiced Hummus
 
Prep time
Total time
 
Ingredients
  • 1 15oz can garbanzo beans, rinsed and drained
  • 2 tablespoons lemon juice
  • 1 - 2 garlic cloves
  • 1 tsp salt
  • paprika (optional)
  • cilantro (optional)
  • 1 pickled jalapeno
  • 1 - 2 tbsp picked jalapeno juice
Instructions
  1. Drain and rinse garbanzo beans.
  2. Combine all ingredients into food processor and blend until consistency is smooth.
  3. Add additional water or lemon juice as needed.
  4. Serve with veggies, pretzels, wholegrain crackers or use as a spread on wraps, sandwiches or even as a "pizza sauce" (yes, it's yummy)!

Oh, and just incase you missed the magical video that my friends at Samba Joy created for me, see below!

A few more photos, snapped by the talented Samba Joy

Carrots and Cake, Nita ShardaCarrots and Cake, Nita ShardaCarrots and Cake, Nita Sharda

                 – With Love, Carrots and Cake,

Carrots and Cake Nita Sharda

The Everything Granola

Carrots and Cake, Nita Sharda

All things good, right here.

Yes, EVERYTHING. This version of a granola recipe is incredibly functional and flexible, not to mention highly addictive. You can mix in different nuts, experiment with a variety of grains such as barley flakes or add in unique dried fruit such as chopped apricots, coconut or even dried blueberries. The options are truly endless which makes this all the more fun.

More and more I’ve been trying to intentionally incorporate Hemp Hearts into my diet. They have a creamy mouth feel and a nutty flavor to them that is irresistible. This is a fairly new seed that is gaining popularity across the nation, and, for the right reasons. The great thing about Hemp seeds is that they are a great option for vegetarian folks that are trying to meet their protein requirements. It’s nutrition profile is quite amazing–beyond the protein, it is also a great source of fibre and those coveted healthy fats (omega-3 and omega-6) which contain anti-inflammatory properties. Okay AND, Manitoba happens to be one of the most successful producers of hemp hearts in North America, HOLA!

Okay, back to business. Enjoy this recipe:
The Everything Granola
 
Prep time
Cook time
Total time
 
Serves: Lots.
Ingredients
  • ½ cup walnut halves or pecans
  • ½ cup hazelnuts
  • ½ cup almonds
  • ⅔ cup almond butter
  • ½ cup honey or agave nectar
  • 2 tbsp canola oil
  • 6 cups old fashioned rolled oats
  • ½ cup wheat germ
  • ½ cup ground flax seeds
  • ½ cup hemp hearts or hemp seeds
  • 1 tbsp cinnamon
  • ½ cup flaked unsweetened coconut (optional)
  • 1 cup dried fruit (chopped dates, raisins, dried cranberries etc)
Instructions
  1. Spread walnuts, hazelnuts and almonds on a baking sheet. Toast in preheated oven for about 8 minutes or until lightly browned at 350 degrees. Caution: be sure to keep an eye on them to prevent the nuts from burning. Remove from the oven, allow them to cool and chop coarsely.
  2. In a medium microwave-safe bowl, stir together almond butter, honey, and oil. Microwave on high for about 45 seconds or until bubbly. Give this liquid mixture a good stir and set aside.
  3. In a large bowl, stir together oats, wheat germ, hemp hearts, flax seed and cinnamon. Pour the warm honey mixture on top of the grain mixture and mix well.
  4. Cover a baking or cookie sheet with Parchment paper and spread the mixture evenly across the pan. Depending on the size of your pan, you may need to use two.
  5. Bake for 30 minutes but be sure to stir the granola every 5 minutes to ensure it is all evenly cooked. Your house should smell like heaven by now.
  6. Once the granola is cooked through, allow it to cool. Place the mixture into a large bowl and stir in chopped nuts, coconut (if used) and dried fruit.
  7. Store in an air tight container, it keeps well for several weeks!
 Let me know what changes you’d make, and don’t forget to leave a comment below or subscribe to the blog!

Carrots and Cake, Nita Sharda

 Carrots and Cake, Nita Sharda       

                  – With Love, Carrots and Cake,

Carrots and Cake Nita Sharda

Baked Oatmeal with Apple & Cinnamon

Carrots and Cake, Nita Sharda

Quick n’ easy.

Breakfast. The most important meal of the day. No, it’s not an old wives tale or a myth. It’s a fact folks. In my practice I meet a lot of clients that just can’t stomach the idea of having a meal first thing in the morning. I always explain the benefits of breakfast very briefly, but also offer new and novel ideas. Some people have just over-killed “breakfasty foods” – you know the toast, cereal, porridge, eggs and sausages, the list goes on. I get it, it gets boring. But heck, think outside the box. I don’t care if you have a sandwich for breakfast or even leftover lasagna. Just have something that is balanced (aim for 3 food groups)! If breakfast for dinner is appropriate, why can’t we have “dinner” for breakfast? Sometimes, years of eating cereal or oatmeal the traditional way can get boring.

There’s also no harm is postponing breakfast either: such as, waiting until you’ve gotten to your office or had some time to really “wake up”.

–    Breakfast. The Most important meal of the day.    –

Other clients express that their morning is often really busy and they simply “have no time”. Being a rather busy-body myself, I can fully sympathize with this one. So what do I tell people? I encourage them to prepare breakfast the night before as they would for lunch. HERE is where this recipe comes handy. It’s a staple in our home and quickly devoured.

This recipe is a version of oatmeal, but baked. You can prepare it in advance and it will offer you 4-6 servings over the week. You can feel free to munch on it as a bar, or pour warm milk over it. Sometimes I like to throw in nuts, fresh berries, coconut or even a mashed banana to change it up. The ideas are truly endless. If you’re making this to serve a large group, you can easily double the recipe and bake into a 13″ x 9″ dish. Store covered in the refrigerator for up to 4-5 days.

4.0 from 1 reviews
Baked Oatmeal with Apples & Cinnamon
 
Prep time
Cook time
Total time
 
Serves: 4-6
Ingredients
  • 1 ½ cups Old Fashioned rolled oats
  • ¼ cup sliced almonds or walnuts
  • ¼ cup dried cranberries (optional: or add in shredded coconut, raisins etc)
  • 1 Apple, chopped
  • 2 tbsp brown sugar
  • Pinch salt
  • 3 cups milk or milk alternative
  • 2 tsp Ground cinnamon
Instructions
  1. Preheat oven to 350 degrees and grease an 8" (2L) baking dish
  2. In a medium size bowl, combine oats, nuts, cranberries, chopped apple, brown sugar, cinnamon and salt.
  3. Once blended together, pour in milk. Mix well.
  4. Pour contents into the greased pan and bake until oats are softened and milk has absorbed. It usually takes about 45 - 60 minutes.
  5. Serve hot or cold.

Nita Sharda, Carrots and Cake

Nita Sharda

            – With Love, Carrots and Cake,

Carrots and Cake Nita Sharda


Spicy Honey Roasted Chickpeas

Carrots and Cake, Nita Sharda

Seasoned and roasted to perfection!

As you can likely tell from the few posts I’ve had since the birth of this blog, I’m a HUGE proponent of sourcing plant based foods as a source of protein. Where do I begin? Beans, legumes, lentils and nuts are packed with protein and heart healthy nutrients to keep your ticker in top shape!

This particular recipe for roasted chickpeas is ridiculously easy and incredibly tasty. What more do you want out of a recipe,  like really? If you’re new to beans, you can purchase them dry and boil until tender. Inspect your dried chickpeas before cooking, throwing out those that are shriveled or have broken skin. You might find some pebbles or twigs which can be discarded. For every cup of chickpeas, soak with 3 cups water. Chickpeas need to be soaked for at least four hours or preferably for 8 hours. To keep things easy, soak them overnight. Throw out the soaking water by putting chickpeas into a strainer and rinsing them well. This washes away the carbohydrates and sugars that cause gas. For more information on chickpeas, check out this article from Eat Right Ontario.

Or, you can easily find canned versions. If you’re going this route, be sure to rinse them thoroughly. Either way, ensure you allow enough time for the chickpeas to completely dry out, otherwise they may not roast nicely for this recipe.

I typically stash these in an airtight container in the fridge and nibble on the chickpeas a little bit at a time. Another way to enjoy this recipe is by tossing them onto a salad. They offer an added “kick” to any salad and a pretty awesome crunch.

5.0 from 1 reviews
Spicy Honey Roasted Chickpeas
 
Prep time
Cook time
Total time
 
Ingredients
  • 1 28oz can chickpeas
  • 2 Tbsp canola oil
  • 2 tsp cumin
  • 2 tsp paprika
  • 1 tsp garlic powder
  • Pinch of black pepper
  • 1 Tbsp honey (or agave nectar)
Instructions
  1. Preheat oven to 350 degrees.
  2. Drain, rinse and dry the chickpeas. You can also use a salad spinner to help them dry a bit faster.
  3. Mix the cumin, paprika, garlic powder and black pepper into the oil. Stir honey into this mixture.
  4. Toss this dressing onto the chickpeas until evenly coated.
  5. Spread the chickpeas in an even layer on a rimmed baking sheet and bake until crisp, about 30 to 40 minutes. Check up on your chickpeas every 10 minutes and roll them around with a spatula.
  6. And, enjoy!


Carrots and Cake, Nita ShardaCarrots and Cake, Nita Sharda

            – With Love, Carrots and Cake,

Carrots and Cake Nita Sharda

Smashin’ Potatoes


Smashed potatoes topped with Jalapeno Monterey Jack cheese

I’ve mentioned in a previous post, in our home we are not carb-phobics (intense fear of carbohydrates). Instead, we fully embrace carbohydrates as the primary source of energy for our body and brain.  In my practice I help misinformed clients understand the role of carbohydrates in a healthy diet and often spend time educating them on the wonderful benefits carbs offer. Typical carb foods can be rich in fibre, folate and iron.  You may even be surprised to know that 45 to 65 per cent of your daily calories should be coming from carbohydrate sources, especially if you’re an active person!

…we fully embrace carbohydrates as the primary source of energy for our body and brain…

Growing up, my primary “carb food” came in the form of an Indian flatbread known as roti. Other families may rely on rice, bread or potatoes as their main “carb” source. After living independently and being able to experiment in my own kitchen, I often gravitate towards whole grain breads, white and sweet potatoes, brown rice, soba noodles and whole grain pasta.

Onto the important stuff.

Here’s an easy peasy take on baby potatoes. Being a cheese lover, I decided to top these babies with Manitoba proud, Bothwell Cheese…the Cadillac of all cheeses (in my opinion).

Smash (gently) prior to baking.

Remember, purchasing local foods helps to sustain our economy and flourish our communities.

Smashin' Potatoes
 
Prep time
Cook time
Total time
 
Serves: 3-4
Ingredients
  • 1lb Baby Potatoes
  • 2 tsp Canola Oil
  • 1 tbsp salt free seasoning (Greek, Italian, plain parsley etc)
  • Dash of cracked black pepper
  • ⅓ cup grated cheese (optional, use dairy free if vegan)
Instructions
  1. Bring pot of water to boil. Add in potatoes, and cook until fork tender.
  2. Drain water from the potatoes and line on a baking sheet that has been drizzled with the oil.
  3. Preheat oven to 350 degrees.
  4. Smash each potato using a potato masher, your hand or even a fork.
  5. Bake for 15 minutes. Top with cheese, bake for another 2 minutes.

        – With Love, Carrots and Cake,

Carrots and Cake Nita Sharda

Chocolate Avocado Mousse

Smooth, creamy and chocolatey.

This is the kind of dessert that makes you feel good as you’re eating it. It also happens to be dairy-free, gluten-free and isn’t chalk full of refined sugar. Now let me warn you, if you’re expecting this to taste like our traditional Jell-O brand chocolate puddings, you need to know it doesn’t. This take on a chocolate mousse plays on the flavor and texture of the avocado–creating a dessert that is smooth and creamy. But heck, who care about all that when it has chocolate in it!

Don’t be alarmed by the addition of soy sauce as an ingredient. It helps to mask the taste of the avocado and enhances the flavor of the cocoa powder. I prommmise. 

Go on, enjoy. 

Carrots and Cake

Chocolate Avocado Mousse
 
Prep time
Total time
 
Serves: 4 - 5
Ingredients
  • 2 ripe avocados
  • 6 tbsp unsweetened raw cocoa powder
  • 5 tbsp maple syrup or agave nectar
  • ¼ cup milk (or water, or an alternative milk substitute)
  • 1 tsp vanilla
  • 1 tsp reduced sodium soy sauce (if Gluten Free source GF soy sauce)
  • Fresh fruit for garnish
Instructions
  1. Place all the ingredients in the bowl of an electric food processor.
  2. Process until mixture is smooth. If the pudding is too thick, feel free to add more liquid.
  3. Garnish with desired fruit such as raspberries, kiwi or mango!

Signature2

Energy Date Balls

Energy Date Balls

These delectable balls are power packed with amazing micronutrients, healthy fats and a ton of flavor. What I love about them is their versatility. It’s easy to pack up and munch on these gems when life is throwing you a few curve balls and time is of the essence. What’s even better? You don’t gotta bake ‘em! These energy balls remind me to never judge a book by it’s cover—though are small in size, they are packed with power. About 2 – 3 of these will keep you full and offer you the opportunity to snack on something sweet without sacrificing nutrition.

Get ballin’!

Energy Date Balls
 
Prep time
Total time
 
Ingredients
  • 1 cup raw almonds, pecans or walnuts
  • 16 dates, pitted
  • Water, for blending (1 – 2 tbsp)
  • ½ cup shredded unsweetened coconut
  • ⅓ cup almond butter
  • 3 tbsp good quality cocoa powder
  • 1 tsp ground cinnamon
Instructions
  1. Pulse almonds in a food processor until coarsely ground. Transfer to a bowl.
  2. Pulse dates in food processor until almost smooth, adding up to 3 tbsp (45 mL) water as needed to help blend.
  3. Add almonds back to food processor with coconut, almond butter, cocoa powder and cinnamon and pulse, scraping down mixture in bowl with a wooden spoon as needed until completely incorporated.
  4. Transfer to a large bowl. Scoop mixture into 2tbsp balls, rolling with your hands; place balls on a parchment-lined baking sheet. Cover and refrigerate.
  5. Makes 18 balls

Recipe adapted from http://naturaldelights.ca/MedjoolDatePowerBalls.html

Energy Date Balls

Perfect on-the-go snack!

Signature2


Truly Tabbouleh

Tabbouleh_main

I think I’ve come pretty close. I wish you could smell it looking at the photo.

It was all thanks to the Shop & Save book that enticed us to take a trip down to Winnipeg’s Exchange District to enjoy some eats from Shawarma Khan. Here we enjoyed their infamous lamb shawarma, a delish chickpea salad and tabbouleh. Everything served was delectable and certainly worth our dollar. The tabbouleh got me—it was the perfect mixture of fresh, flavor and zing. I came home anxious to try my hand at replicating the recipe.

Truly Tabbouleh
 
Prep time
Cook time
Total time
 
Serves: 5-6
Ingredients
  • ½ bulgur wheat
  • 1 cup boiling water
  • 2 bunches flat-leaf parsley
  • 1 bunch mint (approx ⅓ cup)
  • 2 roma tomatoes, finely chopped
  • 1 large cucumber, peeled and finely diced
  • 3 green onions, thinly sliced
  • 4 Tbsp Olive Oil
  • Juice of ½ lemon
  • Salt and Pepper to taste
Instructions
  1. Pour the boiling water over the bulgur wheat in a shallow bowl. Use a fork to quickly stir the water into the wheat, then set aside for 10 minutes.
  2. Fluff the wheat with a fork, then place lid over the bowl and set on the countertop.
  3. Wash the leaves of parsley and mint. Dry completely and then finely chop up your herbs. Combine with the tomatoes, cucumber, green onion and bulgur.
  4. Drizzle olive oil, lemon juice and add in salt and pepper, to taste.

Tip: This salad is great when paired with a soup, pita or kabobs. It lasts in your fridge for 3 days
Tabbouleh_ingredients

Tasty and fresh!

The salad itself will last in your fridge several days—it almost tastes infinitely better the following day once the flavors have had some time to meddle. For those of you that haven’t experimented with bulgur—it’s a form of a whole wheat grain that has been dried and cracked. It can be used as porridge, in baking or as a side dish.

Tabbouleh finishedSignature2